OnSite POS has two modes for finding and invoicing products: scan mode and button mode. Each maximizes the POS for different retail environments, whether you have a high volume business with a limited number of popular products, or carry a much larger set of items. After you create an invoice using either mode, you enter the payments screen to apply payment methods to the balance owing.
To use OnSite POS
In StoreMaster click the POS icon and select the POS mode you want to use.
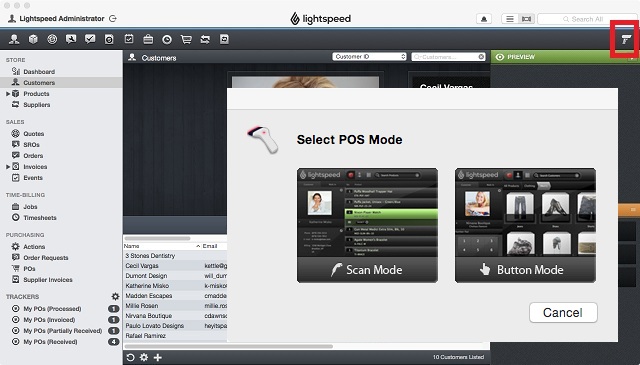
About scan mode
- use if you have numerous product SKUs and use a barcode scanner to create invoices.
- products appear in list view, and are searchable using text entry to produce a list of results from which you choose products to add to your invoice.
About the scan mode screen
The top section is for searching for products, customers, and invoices. Click the icon for the item you are looking for and enter a search term to produce a list of results in the sales register.
The middle section is the POS sales register. It displays invoice information and list views of product info, customers, and serial numbers. This section can display customers and products in the Cover Flow graphical interface. With Cover Flow you can browse images and add products and customers to the invoice by clicking an image.
The left of the POS screen displays customer information, the on-screen numeric keypad for numeric input, and transactions placed on hold. On the right, product information is displayed, including price and availability, and related products for the currently selected product.
Product status
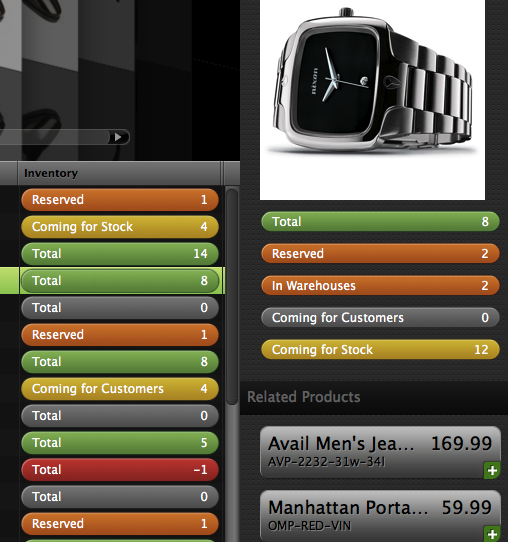
| Available | Quality available to sell | green |
| Reserved | Reserved on orders | orange |
| Warehouses | In a warehouse | orange |
| Coming for customers | On a pending PO | gold |
| Coming for stock | On a pending PO | gold |
| Total | All existing quantities | varies |
About button mode
- use if you have a high volume of products that require short transaction times, and if you primarily sell a limited number of products (approximately 10-100) on a regular basis. An example is a small cafe that sells a variety of coffees and pastries. Button Mode uses
- displays products graphically in nested categories, so that you can click to drill down through categories and find and invoice products
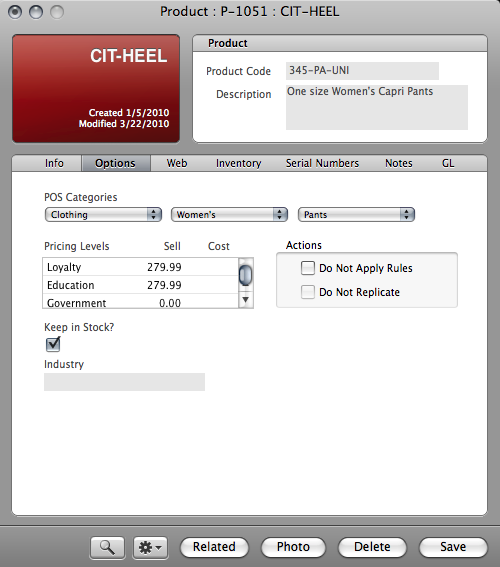
For products to appear in button mode, you create POS categories and assign them to products in a nested fashion that lets you drill down through up to three levels. For example, to sell a pair of capri pants, you can create a path of Clothing (primary) > Women’s (secondary) > Pants (tertiary).

To create POS categories
- In OnSite StoreMaster on the Tools menu click Setup > POS Categories.
- Create your first Primary Category by clicking + under the first column.
- Enter a category name and click Save.
- Select the primary category you created, and click + under the second column to create a secondary category.
- Name and save the category, and repeat if you want to add a third category.

To assign POS categories
- For the product you want to assign a category to, open the product card and click Options.
- Choose a primary category for the product.
- When you click the pop-up menu for the secondary category the choices available for the secondary categories are displayed and you can choose the category you want, and do the same for the third category.
About the Action menu
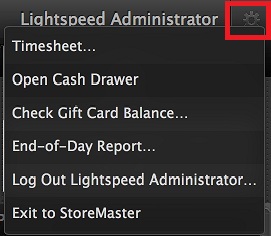
At the top right of the POS screen you can click the Action gear to access these Action menu tools:
| Timesheet | Opens a new timesheet for the logged in user |
| Open cash drawer | Opens the cash drawer without printing an invoice. For a user to be able to manually open a cash drawer, they must have this privilege. |
| Check Gift Card balance | Opens a dialog box where you can check a gift card balance |
| End of Day report | Opens the End of Day report window for printing the End of Day report |
| Log out | Logs out the current user. In a sales environment there is often more than one sales person using the same POS station, and it is important to be able to track the sales people assigned to an invoice for commissions, accountability, and coverage. When a sales person finishes an invoice and leaves the POS station, they can log out quickly so that the next sales person can log in. To log out, click the Action menu at the top right of the POS screen, and choose Log Out (Your User Name). After you click OK, you go to the Login screen, and the POS is ready for the next user to log in. The information on the POS screen is deleted when a user logs out. |
| Exit to StoreMaster | Exits the POS and goes to StoreMaster |
About the Sales Register screen
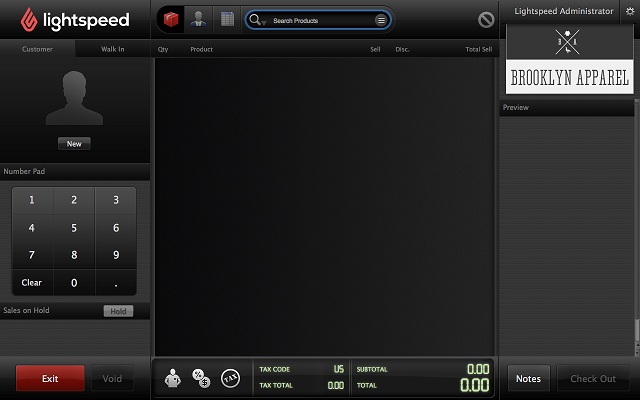
| Exit | returns to StoreMaster |
| Void | clears your unsaved POS screen, discards the information and creates a new invoice |
| Hold | is available after you add a product to an invoice. Takes the transaction's customer and product information and puts it on hold in the Sales on Hold area, and begins a new transaction. You can click the icon to reactivate the original transaction. |
| Notes |
gives you access to enter notes in two fields: Printed Notes that are printed on the invoice, and Internal Notes that are visible only to users. Printed Notes are useful for terms and conditions specific to a sale. Internal Notes can be a useful reference for the future for sales representatives and administrators who require more information about the invoice. |
| Check Out | When you are done entering products on an invoice and are ready to take payment, click Check Out to save the invoice and go to the Payment screen. |
About the Payment screen
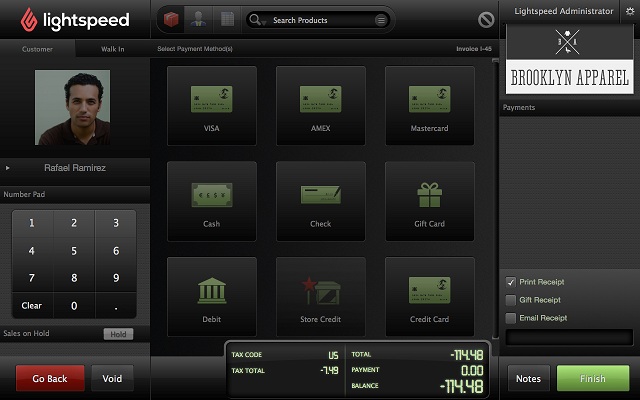
| Go back | Returns to the invoice view in the Sales Register so that you can enter the invoice |
| Notes |
Gives you access to enter notes in two fields: Printed Notes that are printed on the invoice, and Internal Notes that are visible only to users. Printed Notes are useful for terms and conditions specific to a sale. Internal Notes can be a useful reference for the future for sales representatives and administrators who require more information about the invoice. |
| Print options | Print a receipt, gift receipt or email the invoice |
About searching for products, customers and invoices
1. At the top of the OnSite POS, click the icon for the type of search you want to do.
- Product: enables you to scan the UPC code of a product to add it to the invoice. You can also enter a product code or description of a product, including partial strings. As you type a search term, the list of results filters to reflect the appropriate matches. If you don't want to display partial matches, click the down arrow beside the results to Use Exact Match for Product ID. When you find the product you’re searching for, click it once to preview its availability or double-click it to add it to the invoice. To see a list of all of the products in your database click the All icon (the circle with 3 horizontal lines).
- Customer: enables you to enter a customer’s name, address, or telephone number, including partial strings. When you find the customer, click them to add them to the invoice. To see a list of all the customers in your databse click the All icon (the circle with 3 horizontal lines).
- Invoice: enables you to scan or manually enter the reference number of an Invoice. Enter an invoice ID to process a return of products from the invoice.
2. Double-click an item in the list view to add it to the appropriate part of an invoice. If it is a customer, the invoice is assigned to them. If it is a product, the item is added to the invoice as a line item.
In scan mode’s line item and invoice views, the headings include product code, description, quantity, sell price, any discount, and total sell price per item (extended price). Description includes any serial numbers attached to the invoice under their product’s description.