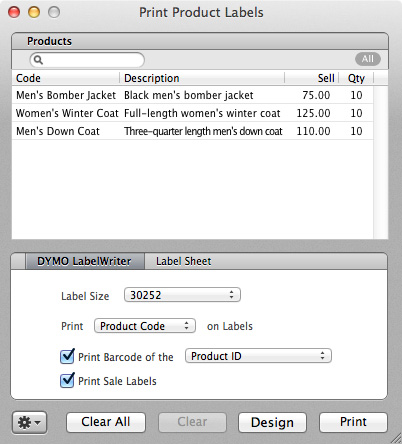
Before you can print product labels, you must have your printer set up. Lightspeed OnSite supports Dymo LabelWriter printers. For how to configure your Dymo LabelWriter printer, go to DYMO LabelWriter. OnSite also supports printing Avery label sheets on a standard inkjet or laser printer.
To print product labels
- In OnSite StoreMaster on the Tools menu click Print Product Labels.
- Scan or search for the products you're printing labels for.
- Adjust the quantities of labels to print, if necessary.
- From the Label Size menu select the label size. If you use label sheets, click the Label Sheet tab and select the size.
- By default OnSite prints a barcode based on the unique product ID. Be sure to select Print Barcode of the Product ID if you're using small labels, such a jewelery labels. This is because if you print a barcode of the UPC or Product Code there can be issues with the barcode being scannable. If you have Multi-Stores you can choose Print Barcode of the Multi-Store Label. Do not choose Product Code or UPC unless you are advised to by Lightspeed Support or your Lightspeed reseller.
-
If you are printing product labels for a Sales Event, select the Print Sale Labels option. The label will display the discounted price along with the Sale Event name.
Note: The Sales Event that a product is associated with must be in effect (activated) in order for the discounted price to appear on the label. -
Click Print.

To print product labels from a purchase order
In OnSite you can print product labels directly from a received or partially-received purchase order. This can help you be ready to put new stock out on the shelves as soon as it arrives.
- Open the purchase order and at the bottom click the Action gear.
- Select Print Product Labels.
- Confirm whether you want to print labels for only the received quantities on this PO. Clicking No prints labels for all of the ordered items, whether they are received or not.
- Confirm that the label size and barcode settings are correct and click Print.
To print product labels from StoreMaster
In StoreMaster select the products you want to label and right-click them. Select Print Label and those products will appear in the Print Product Labels window. You can do this in combination with Smart Finds to choose a user-defined subset of products for labelling.
To print customer labels
You can print customer address labels for shipping or filing. You can also print a customer barcode label that lets you use your barcode scanner to find customers in the POS. For example, you can create store cards or customer cards with a customer barcode on them. Lightspeed OnSite supports Dymo 30252 or 30256 labels and Avery 5259 or 5260 label sheets for customer labels.
- In OnSite StoreMaster on the Tools menu click Print Customer Labels.
- Search for the customers you’re printing labels for.
- Adjust the label quantities if desired.
- Select the label size. If you are using label sheets, click the Label Sheet tab and select the size.
- Choose barcode or address.
- If you are printing address labels, select either the billing or shipping address.
- Click Print.
To print Multi-Store labels
OnSite Product labels use a barcode generated from a unique product identifier, which is either a product ID, product code, or UPC. This is a challenge for Multi-Stores because:
- The product code can be too long to encode in a standard C39 barcode.
- It's possible that not all products have a manufacturer’s UPC.
- The product ID of each product can vary between stores. Stock transferred between stores is not scannable if the barcode is based on the product ID.
The Multi-Store label code is a short code that is a unique identifier for each product and is common to all stores. Each store must have replicated all of its product listings from the master store to be able to print Multi-Store label barcodes.
If you are labelling using a Multi-Store label barcode, you cannot use these barcodes to create a spreadsheet count for use with count inventory. Only barcodes based on the product ID, product code, or UPC can be scanned into a spreadsheet to import into count inventory.
- In OnSite StoreMaster on the Tools menu click Print Product Labels.
- Scan or search for the products you’re printing labels for.
- Adjust the quantities.
- Select the label size from the list of label sizes.
- Ensure Print Barcode of the Multi-Store Label is selected. Don't choose Product ID because product IDs can be different across your stores.
- Click Print.
To print service repair order labels
In OnSite you can generate a barcoded label to tag a customer's repairable item, such as a bicycle. This can speed up service repair order (SRO) lookup and helps ensure the item is not confused with another repairable item. In an SRO, click the gear icon and select Print SRO Label. This label is formatted for the Dymo 30252 label size.