Before you create products, make sure you've completed the other basic configuration steps. For example, adding suppliers is necessary for providing a cost for products. Otherwise products will be sold without accurate cost data and your profit reporting will be inaccurate.
It is important to set a product's properties before you add the product to sales, invoices, quotes, and so on, because these properties are to added to documents. Changing a product to serialized after the product has been added to a quote, invoice, or PO does not automatically update the property on the document, and can create extra work if you modify product properties after you create the product.
If you need to change a major property and want the updated version of the product information to appear on documents, you must first remove the old version of the product from the document and then re-add the updated version.
Tips for creating products
- Do not create duplicate product codes. If you have similar products that are differentiated by size and color, use a color-size matrix to create master and child products.
- Do not modify the product code of a matrix master or child product.
- Use alphanumeric characters in your product codes. The use of special characters in product codes can cause issues with Web Store.
- For products in a matrix, if you want the child products to have the same photo and cost as the master product, you must add the photos and cost to the master product before creating the matrix.
- Do not delete products in Lightspeed OnSite after they have been uploaded to your Web Store.
To create a product
- In OnSite Store Master go to File > New Product, or on the toolbar right-click Product > New.
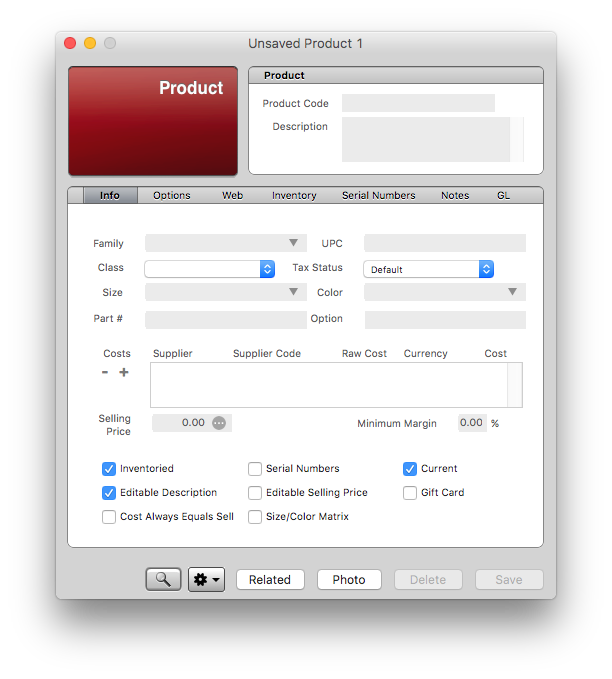
- Add the product code, description, family, and class.
- Save your changes.

|
Product code Each product must have a unique product code. This attribute helps you search, sort, and run sales reports effectively. You can use the manufacturer’s product name or your supplier’s catalog number if you do not want to define one of your own. The product code identifies the product in the system. It should be short (under 12 characters) and can be the same code used to identify the product by its manufacturer, or a combination of different characteristics of the product. It is recommended that you can surmise some basic information about the product from its product code. For example, the product code of the iPod Touch is M2334LL/A. It's possible to identify this as an Apple product because all Apple manufacturer's part numbers begin with the letter M. |
|
Description The product's description is a text description of the product that describes the item’s attributes in detail. OnSite supports printing long, multi-line descriptions on sales documents. This description is searchable in the POS screen and appears on printed documents. |
| Family and class
Family and Class are the two general classifications for a product. It is recommended that you use the brand or manufacturer of the product for Family, and a general categorization such as speakers or tshirts for Class, but this is not a requirement. You can use an entirely different sets of values for Family and Class. Having appropriate classes and families for products helps you with reporting on your sales and inventory in the Reporting or Intelligence tools, for doing batch pricing markups using Set Selling Prices or Set Product Info, and for simple searches and complex Smart Find searches. To create values for family and class list go to Tools > Setup > Products > Families and Classes. For example, a computer shop, can set up classes like Hardware, Software and Service Labor. When they run a report they can filter by class to see the results for only one classes so that they can compare the results with another class to get an overview of their performance. |
|
UPC The UPC is the unique, universal 12 digit number that is printed as a barcode on a product’s box and identifies it when its barcode is scanned. The number can be read below the UPC barcode on the box of the product. You can scan the UPC barcode of the product anywhere in OnSite where you’re searching for a product. This UPC can be added directly in the product profile, or from a purchase order. |
| Tax status
Tax Statuses can be set up in the Taxes setup panel and applied to individual products. A Tax Status can be set up to exempt a product from taxes that are applied to the other products on a document. For example, labor can be exempt from a particular tax. You can create a Tax Status called Labour Tax Exemption in the Taxes setup panel and assign it to a product that is labor. |
|
Size and color Use these fields to select the size and color for a product from the pre-configured list. To create lists of sizes and colors go to Tools > Setup > Products > Size and Color. |
|
Photo OnSite can store 1024 x 1024 pixel images of your products. Click the Photo button and drop a .jpg or .png or an image from a web page. To remove an image, click X. You can also use your iSight camera by clicking the image area, and pressing the space bar to take a photo. Photos can be printed on sales documents such as quotes and invoices. Item images appear on the Web Store and in the POS screen in the Product detail section. You can have a maximum of 12 images for each product. |
| Inventoried
Inventoried means that you keep inventory numbers for a product. A product such as an iPod is inventoried, but a product that's a service, such as a technician’s labor, is not inventoried even though the hours are tracked on a sales document. Be sure to set this option correctly, because selecting it after the product has been added to sales documents can disrupt some features. |
| Serialized
Select this if the product has associated serial numbers. Products such as iPods and 10-speed bicycles generally have a unique serial number for each unit, but an item like an iPod armband or a pair of earrings doesn't. Select this only if you record serial numbers when you receive and invoice the product. |
|
Current Select this if the product is currently available for ordering or sale. You may want to clear Current on discontinued products. In the Company setup panel, you can specify whether only current products are searchable in StoreMaster, POS, and documents. If a non-current product has inventory, it appears in searches until its inventory level is zero. |
|
Editable selling price Select this if you want users to be able to edit the product selling price on sales documents. You may want some products to have editable selling prices, especially if they're custom or built-to-order. If you don't choose this option, a user with appropriate privileges can modify the selling price only through discounting. |
|
Editable description Select this if you want users to be able to edit the product description on sales documents. You may want some products to have editable descriptions, especially if they're custom or built-to-order. This box is selected by default when you create a new product. |
|
Gift card Select this if the product is a gift card, and subject to certain statuses, such as non-inventoried, and non-taxed. When Gift Cards are sold, they are serialized. |
|
Cost always equals sell Select this for products where you want to display the cost equaling the selling price on sales documents. This is useful for selling products without registering changes to your profit margins. |
| Size-color matrix
If you sell products that differ only in size or color, use this to create a large number of multiple products easily. The Size-Color Matrix grid appears where you can enter the sizes and colors for the product. When you click Save, checkboxes appear for each combination. Select the boxes for the products you're creating and click Create Products. The products are added to the product database. These child products have the same info from the original product, and each has a unique product code and description. |
| Part # (GSX Feature)
If you participate in the Global Service Exchange (GSX) for Apple resellers, this field will be automatically populated as applicable whenever a new product is created by the integration. If you do not use the GSX integration, you can feel free to use this field however you like, or leave it blank. |
| Option (GSX Feature)
If you participate in the Global Service Exchange (GSX) for Apple resellers, this field will be automatically populated as applicable whenever a new product is created by the integration. If you do not use the GSX integration, you can feel free to use this field however you like, or leave it blank. |
To add a new cost
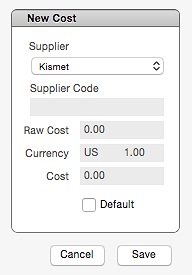
- Beside Costs click + .
- Save your changes.

|
Supplier and supplier code Choose the supplier and enter the supplier code. This is the code/SKU that your supplier uses to identify the product in their system. |
|
Raw cost The raw cost is the amount you pay in the supplier’s currency. In most cases, this is the same currency as the one you use, so the raw cost will equal the cost. If your supplier’s currency is different than your default currency, the raw cost will not equal the cost. |
|
Cost You cannot enter the cost directly. It is an automatic calculation from raw cost. It is the cost, and not the raw cost, that is used in sales reports and appears as the cost in sales documents. The raw Cost appears as the cost on purchase orders and supplier invoices. If your supplier uses the same currency as you this number should be the same. |
To see the cost average for the product
- Click the Inventory tab. Although the cost entered on a purchase order is the raw cost of the product, the value of the product when it is received as the cost in your default currency, affects the cost average. The cost average is the value of your existing inventory for the product. For example, if you receive 10 widgets at a cost of $10 and another 10 at a cost of $20, you have 20 widgets with a cost average of $15. The cost average is used when you sell a product on an invoice. When you add a product to a quote, order or SRO, the cost that is used is the cost of your default supplier. When you save an invoice that is created from one of these documents, the cost is automatically replaced with the cost average.
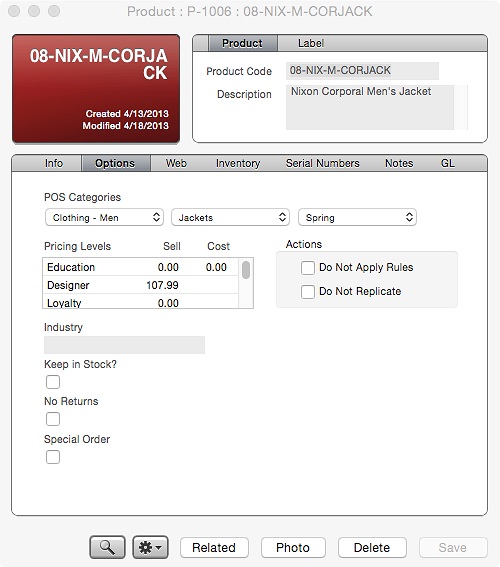
- Click the options tab and set your POS categories, pricing levels, custom fields and options.
- Save your changes.
- To add notes about the product, click the Notes tab. To insert a timestamp with your name, click the Pencil or Command key.

|
POS categories By visually grouping products in the POS layout into nested, drill-down categories, you can access popular items and build invoices quickly using POS categories. You create POS categories in Tools > Setup > Point of Sale > POS Categories, and assign them here to the products you want to display in the POS Button Mode. Products that have no POS categories assigned do not appear in Button Mode, but can be found using the search on the POS screen. POS Categories also power the button navigation in Lightspeed for iPad. |
|
Pricing levels You can set up to ten alternate prices for the product, known as pricing levels. Pricing levels are applied in StoreMaster documents and the POS for manual, pre-defined discounts. You can assign pricing levels to customer categories so that they're automatically applied when a customer is added to a sales document. |
|
Action gear From the Action gear at the bottom of the window you can:
|
Creating special products
From time to time you may need to create products that represent something other than physical stock such as a product to represent shipping charges, your technician’s hourly rate for repairs, or a special one-time coupon you plan to offer in-store.
You can add special products to a sale with either a positive or negative selling price, depending on their function. For example, you can add a special coupon product to a sale with a selling price of $-25.00 to reduce the sale by $25.00.
Special products are usually non-inventoried and have an editable selling price. They can also have a tax status of No Tax depending on their function.
To create a special product
- Create a new product and add its product code and description.
- Clear the checkboxes for inventoried and select Editable Selling Price.
- Optionally, change the Tax Status to No Tax.
- Save and close the product card.