Migrating from Retail to OnSite
Moving product data from Lightspeed Retail to OnSite involves:
1. Exporting the data from Retail.
- In Lightspeed Retail go to Inventory > Item Search. A list your items in Retail is displayed.
- At the top-right list of items click Export. This saves a .CSV file to your default browser download folder with your item details exported into it.
2. Populating OnSite with classes, families and suppliers.
Create additional families and classes
Open the spreadsheet and check the contents of the Category and Manufacturer fields. Category in Retail corresponds to Class in OnSite, and Manufacturer corresponds to Family. In OnSite, set up any families or classes you want to import. In StoreMaster on the Tools menu click Setup > Products > Classes or Families and individually create the classes and families.
For example, if your items in Retail are assigned to the Category of Instruments/Guitars/Electric you create a class in OnSite called Instruments/Guitars/Electric.
| Field in Retail | Field in OnSite | Recommendations |
| System ID | Product Code | System IDs in Retail don’t correspond to fields in OnSite. However, each product in OnSite has a unique product code. If you don’t want to use the 21xxxxxxxxxxx numbers of the System IDs, replace the IDs in the spreadsheet with the alphanumerical codes you want to use. Do not import your products with null product codes as OnSite will not function correctly without unique product codes. |
| UPC | UPC | Alternate barcode field in OnSite. UPCs or EANs can be entered without issues. There is only support for a single alternate barcode. If you want to have two different scannable barcodes, one of them must be the product code. |
| Manufact. SKU | Supplier Code | SKU that the default supplier, who you’re importing the cost for, uses for the product. |
| Item | Description | Name or text description of the item. |
| Qty | Inventory Quantity | Current inventory in stock |
| Price | Sell | Price in the default currency |
| Tax | Tax Status | If you have products that you've configured to be non-taxable in Retail, you’ll use find and replace on the Tax column of the spreadsheet to replace No with No Tax so that it matches OnSite's default No Tax tax status. If you haven’t entered Tax information in Retail, do not select this field. |
| Category | Class | Make sure you've created the classes you need in OnSite. For details go to Create_additional_families_and_classes. |
| Manufacturer | Family |
Family is a wild-card field and can be matched with any other fields, such as Season or Department. Make sure you've created the families you need in OnSite. For details go to Create_additional_families_and_classes. |
| Default Cost | Cost | Cost that will be listed with the supplier and supplier code you’re importing. |
| Vendor | Supplier | Name of the supplier you purchase the product from. Make sure you create the names of your suppliers before you import. |
Map vendors with suppliers
Map your vendors in Retail as suppliers in OnSite.
- In OnSite StoreMaster in the left sidebar click Suppliers.
- At the bottom of the StoreMaster window click New.
- Give the new supplier a name and click Save. This name must be a case-sensitive match with the name on the spreadsheet.
3. Importing the data into OnSite.
- In OnSite StoreMaster do a backup of your database.
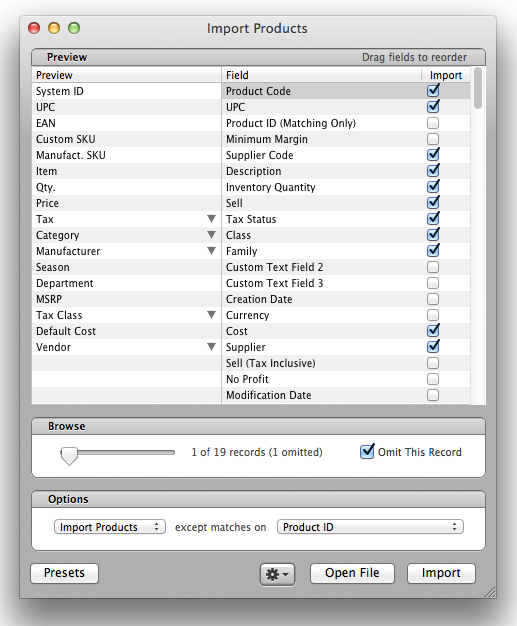
- On the Tools menu click Import Tools > Import Products.
- Click Open File at the bottom of the panel and navigate to the .csv file you exported from Retail.
- Match the OnSite Import fields on the right by clicking and dragging them to match the corresponding Retail Export Field that appears in the left-hand column.
- Only the fields with checked boxes will be imported into OnSite. This example shows the only Retail fields that have an applicable matching fields in OnSite.
- When you have checked that everything is matched correctly and only the columns you want to import are matched, in the Browse area make sure the slider is at record 1 and select the Omit This Record box.

- Click Import.