Configuring OnSite POS involves setting up each POS's hardware, printing and default screen settings, and the global settings and behavior for your OnSite POS, such as your company logo, and settings for making sales from the POS screen.
To set up your OnSite POS stations
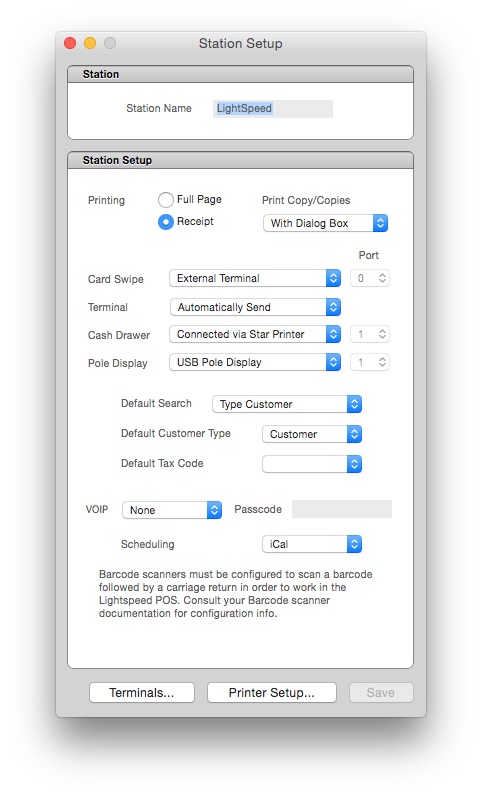
In the station setup you configure the settings that are specific to each station: POS hardware, printing configuration, and defaults for the POS screen, including tax configuration, search settings, and customer type.
- In OnSite StoreMaster on the File menu click Station Setup.

| Station name | Set the name for this POS station. This name appears on receipts and can be reported on with OnSite’s Reporting tools. |
| Printing |
You can set your printing format to be standard, letter-sized paper, suitable for regular laser printers, or a receipt printer. Formatting is automatically adjusted for each size. You can also disable the print dialog box when printing. By entering a positive value in the Print Copies field, that number of invoices will be printed without a dialog box. This is applicable only to Invoices – a print dialog will appear for other documents. If you set the value to zero, a dialog box appears for Invoices as well. |
| Card Swipe | Choose the supported card swipe device for credit card transactions, either ID Tech or ID Tech Omni 3237 |
| Terminal | Select Manually Send to require the user to select a card-type payment method to send payment to Cayan Genius terminal, or Automatically Send to have the payment sent to the Genius terminal as soon as the user clicks Check Out. |
| Cash Drawer and Pole Display | If you are configuring a cash drawer or pole display, select the method of connection in the pop-up menu, and the port you’re using. For more information, see Installing hardware. |
| Default search | Set which search criteria: UPC, Product Code, Description, or Document ID, to use as the default in the main POS window |
| Default customer type | Either Walk-In or an existing Customer. If you don't want to track information on your customers, choosing Walk In will can accelerate the speed with which you can perform a transaction. |
| Default Tax Code | The Tax Code to use on new sales documents from the list you have set up in Taxes Setup. You can still choose another tax code for an Invoice regardless of this default setting |
| VoIP | |
| Scheduling | Choose either iCal or Now Up to Date for your scheduling. |
To configure your general POS settings
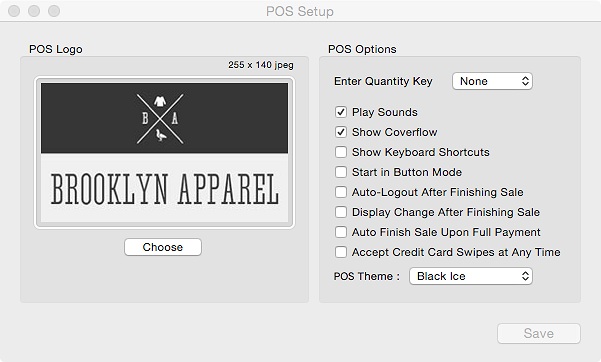
The general POS setting control the global settings and behavior for your OnSite POS, such as your company logo, and your settings for making sales from the POS screen.
- In OnSite on the Tools menu click Setup > Point of Sale > Point of Sale.

| Logo | Add a logo to appear on the POS screen. Drag a jpeg file with a maximum resolution of 255 x 140 dpi into the window, and it is automatically added to your POS screen. |
| Enter Quantity Key | Select a key (= or *) that places the cursor in the Quantity column of the active line item on a POS Invoice. |
| Play Sounds | Enables POS sounds when actions are taken in the POS. |
| Show Coverflow | Enables Products and Customer images to be displayed using Cover Flow technology in the POS Scan Mode. Disabling Cover Flow displays Products and Customers in list view. |
| Show Keyboard Shortcuts | Shows the key combinations for the POS screen |
| Start in Button Mode | If you are a high volume retail environment with a limited number of popular Products, you can use Button Mode to create Invoices in the POS. Selecting this checkbox displays Button Mode automatically when you enter the POS screen, bypassing the dialog that asks which mode to use when logging into the POS. |
| Auto-Logout After Finishing Sale | Automatically logs out an OnSite user after clicking the Finish button on the POS. |
| Display Change After Finishing Sale | Displays the change owing to a customer after they pay with cash. |
| POS theme | Choose either Black Ice, a dark, high-contrast theme, or Enlightenment, a light theme. |
| Auto Finish Sale Upon Full Payment | Selecting this checkbox streamlines the payment process. After a user checks out, applies a payment method, and the balance is zero, click OK and the sale completes. |
| Accept Credit Card Swipes at Any Time | Works with Credit Card Mapping in the Basics setup to auto-detect credit card type during a swipe at any point in the payment screen of POS mode. |