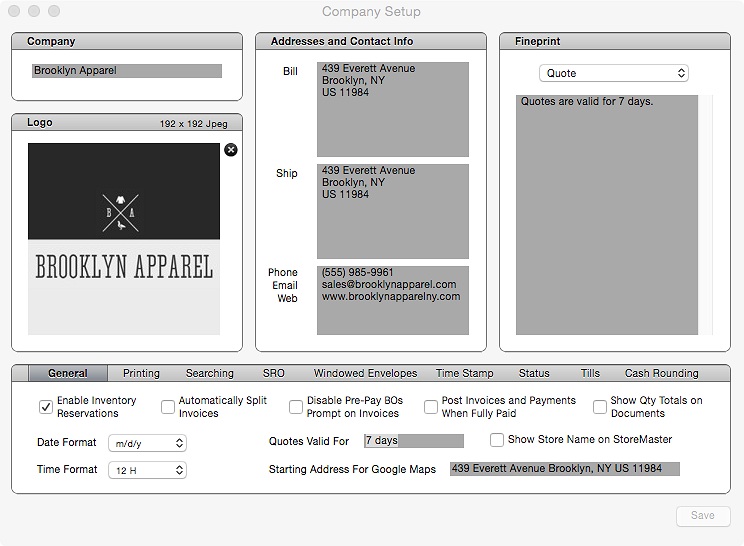
- In OnSite StoreMaster go to Tools > Setup > Basics > Company.

To enter your company contact information
-
company name
-
billing and shipping addresses
-
phone numbers
-
email
-
website
- fine print that you want to include on quotes, SROs, invoices, orders, purchase orders, supplier invoices, and accounts receivable statements.
To add a logo
You can add a 192 x 192 pixel JPEG logo. Drag a JPEG to the Logo section, and the image is scaled and saved to the database. This logo appears on your printed sales documents.
To set your general preferences
Enable Inventory Reservations is enabled by default, so that you to reserve inventory on Orders. If you do not reserve products for customers, disabling this feature makes it impossible to reserve stock on orders.
Set the date and time formats you want to appear in the software and on printed documents.
To set your search preferences
Click Searching and set your preferences.
| Search current products only | Disregards products with their current status not selected in the product card when you search in StoreMaster, the POS or sales documents, if they have no inventory quantities. |
| Search only after user types Return | Clearing this checkbox enables displaying search results as you type. If you select this checkbox you have to press the Return key after you enter your search term. |
| Combine scanned quantities for documents/POS | Tallies the quantities of the same product code scanned into sales documents or the POS. Clearing these checkboxes creates multiple line items for the same product code when it is scanned or typed. |
| Disable cover flow | Removes the cover flow layout from the POS and StoreMaster. Cover flow is a layout that browses customers, products and suppliers by image. |
To set your status preferences
Click Status and choose your preferences. The checkboxes here enable you to automatically mark sales documents as invoiced when they’re converted to an invoice. The status is used in Trackers, Smart Finds, and simple searches in Store Master.