- Quotes and invoices are the beginning and end of the OnSite sales workflow.
- Money taken on an invoice is a payment.
- You can apply deposits to invoices as payments to change a customer’s accounts receivable balance.
- You can post invoices to finalize them for accounting export, or void them.
The standard workflow in OnSite is to create a quote, which gives your customer basic pricing information. If the customer puts a deposit on the quote, you then convert the quote to an invoice when the customer takes the product home, and the deposit gets applied to the invoice. If a product is not in stock or you want to reserve a product for a customer, you convert the quote to an order, which becomes an invoice when the customer takes the product home.
Invoice walkthrough
1. Create a new invoice
There are several ways you can create an invoice in OnSite StoreMaster: from the New Invoice icon, from a quote, from an order, by right-clicking the invoice source, or using drag and drop. To create a new invoice click the Invoice icon and populate the invoice. Creating an invoice from a quote or order auto-populates the customer and the products. Any serialized products must have serial numbers attached to them. You can use drag and drop to choose the products you want to sell by control-clicking the items in StoreMaster and dragging the group onto the Invoices source in the Source List.
2. Optionally add serial numbers
Invoices are structured like quotes, with the additional that you can take payments. If if you add a serialized product, the message Serial Numbers Needed appear beside the product search bar along with a gold warning icon. You must enter the serial numbers before taking payment.
To do this, click the product once, and the message changes to X serial numbers needed, X being the quantity sold. You can then scan the serial numbers using your barcode scanner or enter them manually.
The serial numbers should exist in the available inventory. To display a list of them, click the All button when OnSite asks you for serial numbers. If the serial number you enter does not exist in your inventory, you are warned and can then sell the serial number for later reconciliation. After you enter the serial numbers, the warning icon disappears.
3. Optionally backorder products
When you add products that are not available to an invoice, a red warning icon appears beside the product in the Product search bar. You now have three choices.
- You can remove the product from the invoice by selecting it and clicking the x icon or clicking Delete.
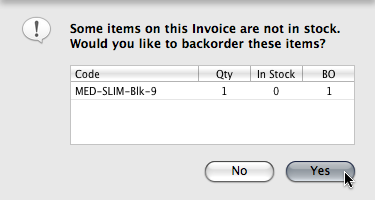
- You can create a backorder for the product. When you click Save, OnSite displays a message showing any products on the invoice that are not in stock, and the option to backorder them. Click Yes to include in the BO column the quantities not available or click No to sell the unavailable Products anyway.
- You can then click OK to proceed, selling the product and bringing the quantity of that item to a negative value.
If you backorder unavailable products you are asked if your customer would like to pre-pay for any backorders on the invoice. If the answer is yes, the amount owing is the entire total of all products on the invoice, but a credit appears for the products that weren’t Invoiced at the time of purchase, which can be applied when the products arrive and are invoiced.

4. Take payment
Saving an invoice assigns it a unique ID which is used for later reference and takes you to the payments screen. Payments for the invoice are registered here, including credits for the customer. To apply a payment to the invoice, click the button for a method of payment you have set up in the Tools menu. The amount tendered automatically shows the balance owing on the invoice, which can be edited for partial or split payments.

OnSite integrates with payment gateways such as Cayan, Axia, HPS and Authorize.net for fast, simple, accurate processing of credit card transactions. At the time of purchase you can enter the customer’s credit card information and click process to send the encrypted information to the credit card gateway. If the transaction fails, you are notified immediately. For successful payments, a confirmation number is logged on the invoice. You must click the Save button to register the payment to the invoice. OnSite automatically accesses the processor for any method of payment specified as credit card in Tools > Setup > Payment Methods.
If a customer wants to use more than one method of payment, you can modify the amount tendered depending on how much they want to use for each payment method. Save the payment and click another button for the next payment method. The customer can choose to use the same method of payment, but from a different source such as two Visa, or different payment methods. The payment methods are shown on the printed invoice.
Click the Save button for a payment to save it to the invoice. This is irreversible except by authorization by an administrator.
5. Optionally apply credits
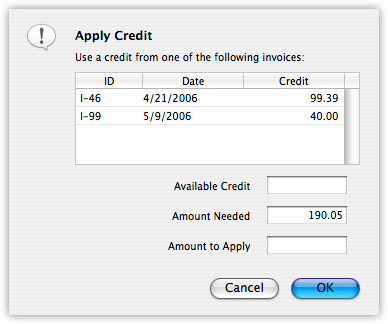
If a customer has a credit from a previous invoice or a deposit on quote, SRO or order, you can apply it as a payment. Click the Apply Credit button to display a list of the customer’s available credits. Choose one and specify how much to apply. If a customer wants to apply more than one credit, choose each one separately and save it as its own method of payment. Click OK to return to the Payments view of the POS screen. OnSite cross-references both invoices within the other's payment screen.

6. Print the invoice
When you print an invoice, the information you have added appears on it. The invoice number and its barcode equivalent appear, along with the creation date and the dates of any modifications. The product section displays the product description and image, if you have enabled images to be printed. Any notes you added in the printed notes field appear after the products, and below that the details of the payment methods. The bottom left of the invoice displays the terms or conditions you have set up in Tools > Setup > Company in the Invoices field.
7. Post and export the invoice
There are two steps in the accounting export procedure: posting and exporting. Posting finalizes a transaction, a sale, payment, inventory adjustment, or supplier invoice, before it is exported. The status of the invoice is shown by a green P or blue E. To modify an invoice that has been posted or exported you must unpost it. You can then re-post and re-export the invoice, or mark it as exported if you do not want to export it a second time.
Invoice actions available from the Action gear
| Post invoice | Posts, or finalizes, the invoice, locking it from any editing (apart from adding notes), which is a step necessary in the accounting export workflow |
| Void invoice | Rather than deleting an invoice, you can remove products and payments from it, and void it, maintaining your ID number sequence and adding a note to explain why you voided it |
| Mark as exported | If an invoice or a payment is unposted so that an administrator can make a change that wouldn’t otherwise be possible, you can re-post and re-export it, or use Mark as exported to mark the invoice as exported if you don’t want to re-export |
| Print full page/receipt | Lets you print a copy of your invoice to either a full-page or receipt printer |
| Print box label/gift receipt | Lets you print a shipping label or a gift receipt that doesn’t include prices |